Exposure - Part 2
In the first part of this series, Exposure - Part 1 we looked at how the aperture effects the amount of light entering into the camera. But of course the aperture also effects how the scene is perceived through how it controls the Depth of Focus, or DOF for short.
When we focus a camera lens on a subject that is some distance away from the camera, the photograph we take will physically only be in sharp focus at the distance the lens was focused at. However, the aperture can increase the apparent depth of focus in front of and behind the subject we have focused on. The aperture can physically make objects closer and further from the actual subject appear as if they are in focus as well. The series of diagrams below show how this takes place.
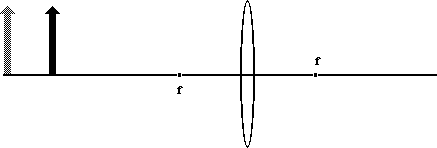
Here we have a simple lens of focal length f. We place two objects in front of the lens, a black arrow and a gray arrow. We will now focus the simple lens on the black arrow.

Here with the lens focused on the black arrow, we see that two rays of light moving through the lens will refocus at the arrow behind the lens to reproduce the image of the arrow although inverted.

And likewise when we focus the lens onto the gray arrow we reproduce its image as well.

Now combining how the lens recreates both images at the same time we can see that the images of the two arrows are not reproduced in the same location. The image of the gray arrow is closer to the lens than the black arrow. This should not be surprising as the gray arrow is further out away from the lens to start with so its images should be reproduced to the left of balck arrow image in the sam proportion.
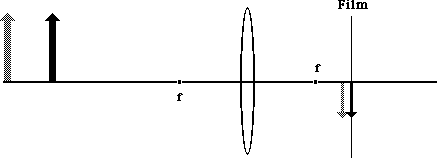
Now if we placed a piece of film (or a digital sensor) at the location behind the lens where the black arrow is reproduced, we can capture the image of the arrow in sharp focus. But what about the gray arrow? Its image is focused a little bit in front of the film plane.
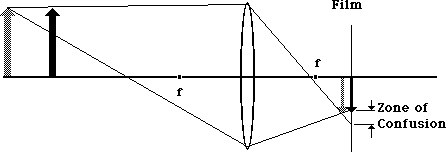
With the lens aperture wide-open light rays from the gray arrow can come in and will come together where the gray arrow would normally be in focus. However there is no film there. If we continue the rays of light past the gray arrow focus point until they hit the film plane we see that they will produce an image, but one that is un-focused. Instead of a sharp arrow tip, we now have a big blur, in fact it will be a circular blur, a circle that is called the "Circle of Confusion". As we look on from the side, we see it as a "Zone of Confusion".
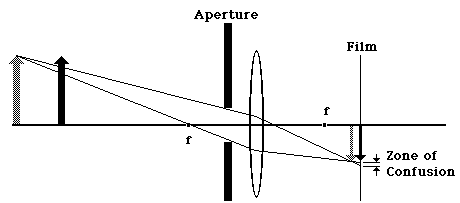
Now let us place an opaque baffle in-between the arrows and the lens that has a small opening that limits how much of the lens will actual see light. We will keep the lens focused on the black arrow. This forces the rays used in recreating the image of the gray arrow to be narrower and thus will push the point of where the rays meet to recreate its image closer to the film plane, although it will still not be in focus. However as we extend the rays of light onto the film plane we notice that the zone of confusion has now been reduced substantially.
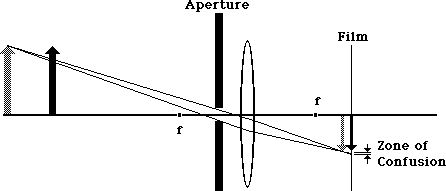
And if we reduce the size of the opening even more, we can force the zone of confusion down even further until we will get an image of the gray arrow to appear on the film plane that is essentially focused.
Thus, the aperture can control how much of the scene in front of the camera can be in focus. The smaller the aperture used the more of the scene will appear to be in sharp focus. In fact for the 35mm film the acceptable Circle of Confusion (CoC) needed at the film plane to make images appear to be in sharp focus is 0.03 mm! That is the circle must be no bigger than 0.03 mm at the film plane. And the smaller the imaging area the smaller the CoC must be. The size of the CoC is determined from what an image looks like at an enlargement size of 8x10. In other words, what CoC is needed at the film plane that will result in an 8x10 photograph with acceptable focus. Make bigger enlargements and you might need an even smaller CoC.
Now we could continue and discuss all the mathematics involved in working out the DOF, but I think that will only bore you and you can find other sites on the web that go into all the excruciating details. In practice there are four factors that determine the DOF.
1. Aperture: Smaller aperture on a given lens will produce more DOF on that lens than a wider aperture used on that lens.
2. Focal length of the lens: A smaller focal length lens will give an apparently larger DOF than a longer focal length lens photographing the same scene from the same location.
3. The camera to subject distance: The closer the camera is to the subject the smaller the DOF will be.
4. The size of the subject: The smaller the subject photographed the smaller the DOF will be.
Here are a few examples.
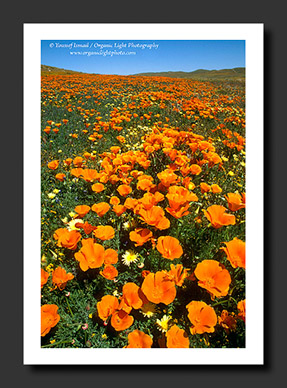
This field of poppies was photographed using a small focal length lens, 24 mm, with the smallest aperture it has, f/22. The lens was focused at about 3.4 feet, yet the entire scene from the closets poppy to the horizon line is in apparent sharp focus. Small focal length, small aperature.
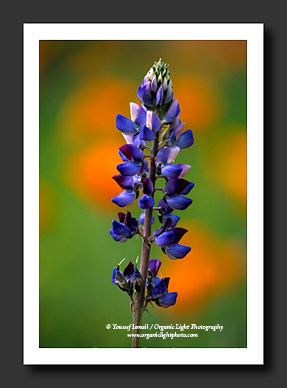
This sprig of lupine was photographed using a 200 mm lens. It was focused at about 15 feet with the aperture wide open at f/4. Notice how the DOF has been reduced. Only the lupine is in sharp focus. The background grasses and poppies have been left a blur. Long focal length, large aperture.
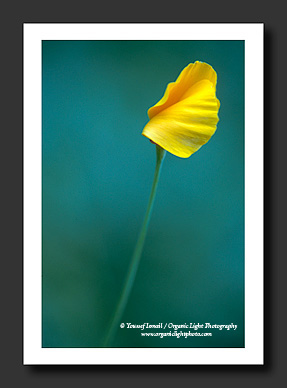
Here this lone poppy blossom was photographed using a 200 mm lens, set up to allow close focusing (or macro focusing). The poppy blossom is only a few inches away from the lens and the aperture is closed to about f/16. Even with the small aperture, the extra close subject-to-camera distance and the long focal length work to produce very little DOF. Small aperture, short camera to subject distance, small subject.
So with the completion of this part of the series we now see how the aperture effects the exposure by letting in more or less light as well as seeing how the aperture can effect the apparent focus of the image. With this, we have arrived at the half way point to determining the correct exposure of a scene. In the next article in this series we will look at the shutter speed and how it rounds out the exposure.
Was this article helpful?
Click Here and let us know.
Your feedback is important to us.
|
|
|


